Well it may seem like not much is happening since I haven't posted any pics since Friday, but quite the contrary is true.
Saturday morning, ny dad stopped by and helped me dig into the project. We got together a fairly comprehensive list of the parts needed to complete the assembly process:
1013 Magnetic Plug, Hex Socket 1/2-14 NPT - To block off the unused ports in the oil tank.
1069-06MF 6AN Male to 6AN Female Adapter with 1/8 NPT in Hex - Fuel Sampling
1270-BASIC-10/32 Custom Throttle Cable with Two 10/32 Stud Ends
1270-INCH Length Charge for Throttle Cables (per inch of Jacket) - Custom Throttle Cable
1275 10-32 Right-Hand Thread Female Rod End - Throttle Cable Ends
3077-002-0625 Saddle Washer for 5/8" Diameter Tubing - Shift Linkage
3077-002-0750 Saddle Washer for 3/4" Diameter Tubing - Shift Linkage at Gearbox
3250-08-12 1/2 NPT Male- 12AN Male Alum Adapter - Oil Fitting to oil tank adapter
3271-10-000 Straight Alum. #10 Hose End / 10AN - Oil Feed Fitting at bottom of oil tank
3271-12-150 150' Aluminum #12 Hose End / 12AN - Oil Return to top of tank
4419 Weatherproof Toggle Switch Boot - Cover for fuel pump switch
Plus a resupply of Allen Head fastners:
632-3-0.625 10-32 x 5/8 Flat Head Allen Screw
632-3-0.750 10-32 x 3/4 Flat Head Allen Screw
632-3-1.000 10-32 x 1" Flat Head Allen Screw
632-3-1.250 10-32 x 1-1/4" Flat Head Allen Screw
Estimated Order Total (all amounts in US Dollars) 221.22
Pegasus Auto Racing Supplies, Inc.
2475 S 179th St
New Berlin WI 53146 USA
Order Toll Free: 1-800-688-6946 (US & Canada)
E-Mail Us at: info@pegasusautoracing.com
We then proceeded to wiring. By the end of the day we had the dash, fuse block, dash switches, and battery cutoff switch installed and wired.
Sunday I continued to fit the engine side wiring. That process is now complete, and I am in the process of installing the AIM system.
Sean
Monday, February 28, 2011
Friday, February 25, 2011
Final Fuel Cell Install and Mods


The Pegasus order came in tonight as well as the AIM system. So next on the agenda is plumbing and wiring work...
The work is getting more and more satisfying now as the car comes together. It is looking more and more like a real car again.
Sean

Thursday, February 24, 2011
Suspension (continued)

I did get a bit of inconvenient news earlier today. Steve Lathrop dynoed my shocks and more or less concluded that I need to spring for some "real" shocks. So after chatting with Eric about my options, I posted a search for used 8670s on ApexSpeed. Gotta love the Apex community - by the time I logged on tonight after dinner I had three different options...
I think the plan for now is going to be getting the old Konis back ASAP from Lathrop so that I have the option to use them for a test outing at VIR (March 11th). If I can acquire the Penskes in the mean time I will work that option in parallel.
On the good news front Eric tells me that the plating shop is working on the engine bay pieces and may be able to get them done in a couple of days. So hopefully I can get those back earlier than I originally thought.
Tomorrow my Pegasus order should be in and I should get the AIM Dash and EVO system. So wiring and plumbing work should commence shortly.
Sean
Suspension Reassembly
Good and bad news here:
- The good - the wheel fits nicely and clears the ICP calipers with no problem. They are attractive simple and very light weight.
- The bad - they are pretty expensive and I am going to order two sets in the morning. :)


Wednesday, February 23, 2011
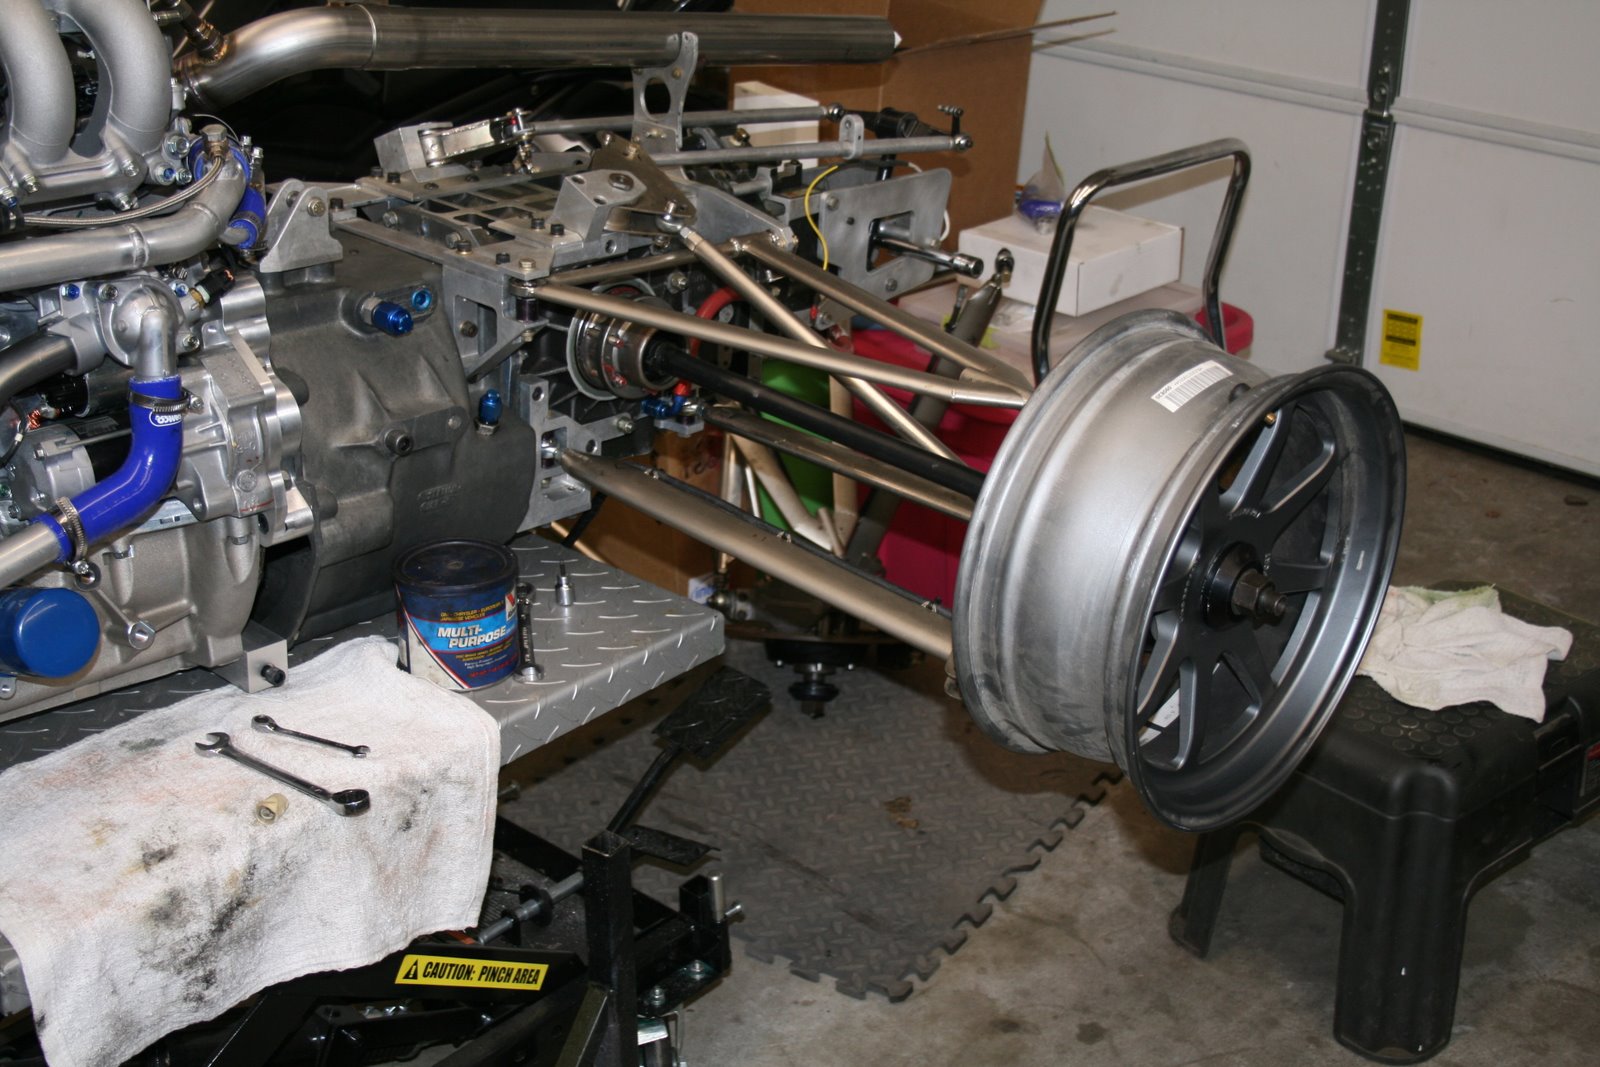
Installing the Engine and Gearbox

I hope the slave cylinder actually works once I bleed the clutch system...

This process was a little more tedious, being a one man operation. It took a few tries to get the front studs aligned with the holes in the bottom of the chassis and then to pursuade them to slide all the way in. But in the end it all went together nicely with minimal muscling. Now it is really starting to look like a racecar again.

I am really glad I decided to go with the overhead/center exhaust setup. I think it makes the package much cleaner.

Eric needed to keep the engine bay "cradle" pieces in the shop right up to the end of the fabrication process. So they are out for plating right now. So for the next week or two, I will have to work around not having them. But Eric tells me that the engine pan is incredibly stout and I can fell confortable putting the car up on stands without the engine cradle in place. I think to feel safe, I will keep the cart in place for now to support the engine and gearbox, but it is nice to know that everything is so strong.
On a related note. It is nice to know that I am starting with a square chassis. Eric had removed the skid blocks during the fabrication process and the chassis sat perfectly flat on the surface plate. Eric confirmed the location of the pickup points were all correct as well. With a 15 year old car, you never know what you are getting into so this was good peace of mind.
So that is it for tonight.
Coming Soon:
- Test fitting a Panasport Megalite wheel (Neil Porter's 'demo' wheel should be in tomorrow).
- The Pegasus order has been placed, and parts are on the way to do the wiring and plumbing work.
- The AIM system is also enroute and should arrive Thursday.
- Installing the wiring harness.
- Fuel System plumbing
- Oil Lines and vent system plumbing.
- Measuring for and ordering the new throttle cable.
- And much, much, more...
Later,
Sean
Annular Cylinder Install

Annular cylinder installed with the HPD spacer. Took a little fitting as the spacer was drilled for 1/4 studs on the Swifts. My gearbox has 5/16 threads, so a little work with the drill press was required to make everything fit happily. Seems like even the simple jobs like this can stretch into a couple fo hours...

Tuesday, February 22, 2011
It's back!

First order of business was to do a little touch up paint on the frame mods. Shown here are the newly painted tabs that Eric added for the new upper engine mount.


Unfortunately, the 90 degree fitting supplied in the HPD kit is not a good fit for the Citation installation. As it is now it fouls the large chassis reinforcement plate behind the firewall. While I could probably reclock it and make it work, I think a straight fitting with a 90 degree elbow on top will probably work better.
The original fitting was a straight AN6, so I will probably order one of those too just to cover my bases. So add Pegasus to my morning order list...

Finally, I had to enlarge the opening in the top cover plate to allow access to the wiring fitting for the fuel pump. That at least seems to fit nicely. (sorry for the dark photo).
Tomorrow parts orders. Unless I am confident that I can change out the AN4 fitting with the engine in place (and I am not). I will probably have to wait until the parts come in the get much further on putting the engine in place. But there is plenty of other stuff to keep me busy in the mean time.
Sean
Sunday, February 20, 2011
Getting ready for assembly

Eric Langbein tells me that his work is nearly complete, and I can pick the car up on Monday afternoon. So today I borrowed my dad's hand chassis stand. He built the stand to assist with the conversion of his Swift DB1 last winter, so it is "Fit"ing that we keep it in the family for my conversion.
So tonight I did a little cleanup and begun to get ready for the reassembly process. Tomorrow I will finish organizing the garage and move all of the extraneous stuff out to the trailer and my other storage closet.
Other recent developments:
Wheels - I got the Panasport Ultralites in this week only to discover that they will not work with the ICP (LD20 size) calipers on my car. So it is looking like Megalites are my only option at this point. (I am also considering the new OZ and Jongbloed wheels, but they will not be available until May). Neil Porter has been very helpful in this area, and has shipped me a 'dinged' Megalite to trial fit. If that works I will probably order two sets (definitely breaking the budget I had in mind, but what the heck they are nice and very light).
On a related front, I posted a call for help on ApexSpeed earlier in the week to identify the 'rains' that came with the Citation. Keith Averill was right on the spot and ID'ed them as older (circa 1990) Panasport C4 wheels. They are very nice wheels, and talking to Keith, I can still get the proper rim halves (special ordered from Japan) to make them work for FF. So while they will not be quite as cheap and simple as the Panasport Ultralites I was hoping to use, they will work and they look pretty cool too.
So my working plan for wheels right now is to run Megalites for VIR and hopefully get the rim halves in just in time to make the C4s my rains. If not I will probably pray for dry weather and keep the rains unmounted and only mount them on the second set of Megalites as my contingency plan. (It will probably rain all weekend now at VIR).
On a related note, Rodney and the good folks at Appalacian Race Tire shipped me a new set of rains this week. So those are now sitting on my office floor waiting for me to figure out what to mount them on. At some point soon I will need to mount something if only to get the car aligned and set the corner weights. I understand that the series spec tire should be availble soon, so hopefully I can get a set of those on the way to me next week.
AIM System - Ellen Ferguson tells me that I can expect my EVO4 system and dash delivered to me Thursday. Just in time to keep my wiring process on track. Now I need to put together the rest of my order from Pegasus for the fuse block etc.. With a little luck, I should be able to get all of this together over the ladder part of next week and the weekend. It may be dreaming, but I can envision having the car running by next Sunday afternoon.
Shocks and Suspension - Steve Lathrop tells me that the shocks should be ready by the end of the week, also just in time for reassembly. After much hand wringing and discussion (and some good advice from Eric Langbein) I have decided to retain the rear suspension setup as it was when I purchased the car. The lure of running the updated bellcranks and pushrod geometery was strong, but changing all of this out this late in the process is just a recipe for disaster. Steve tells me that the current setup I am planning to run is identical to what John LaRue used to win the Runoffs a while back, so I think I can live with that. Hopefully I can fit the suspension updates in shortly after the VIR debut. One less thing on the to-do list and one less stress to deal with...
Front Bodywork Complete...


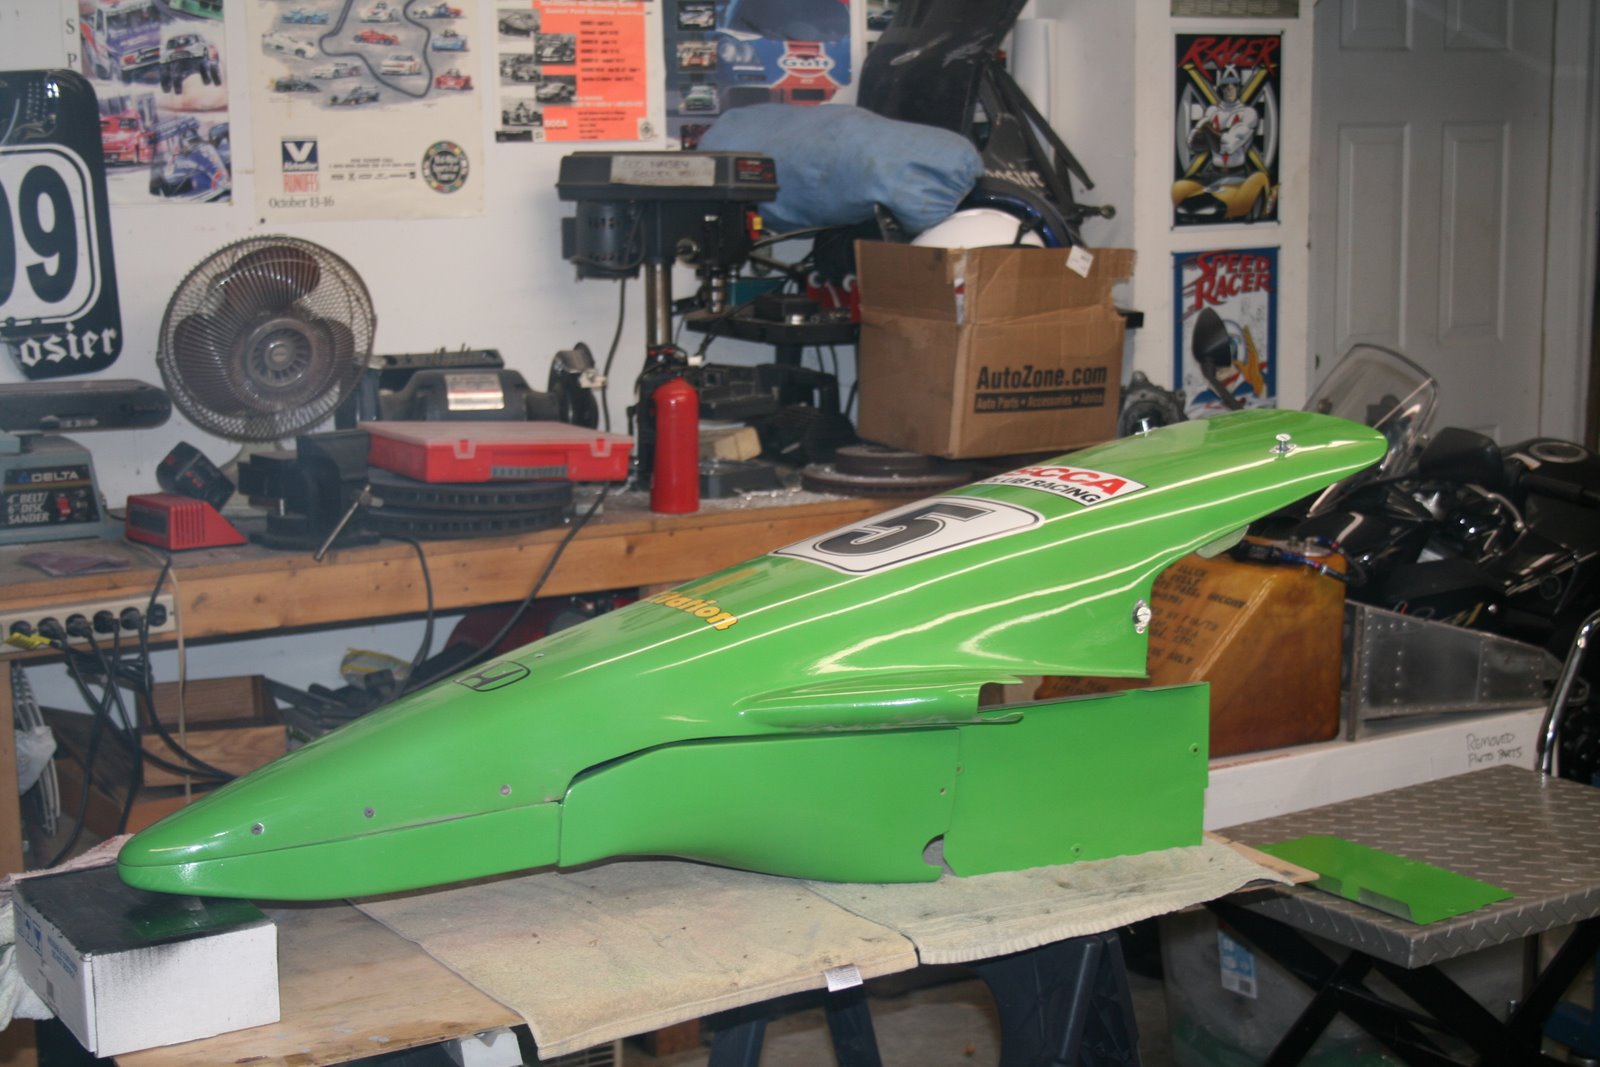
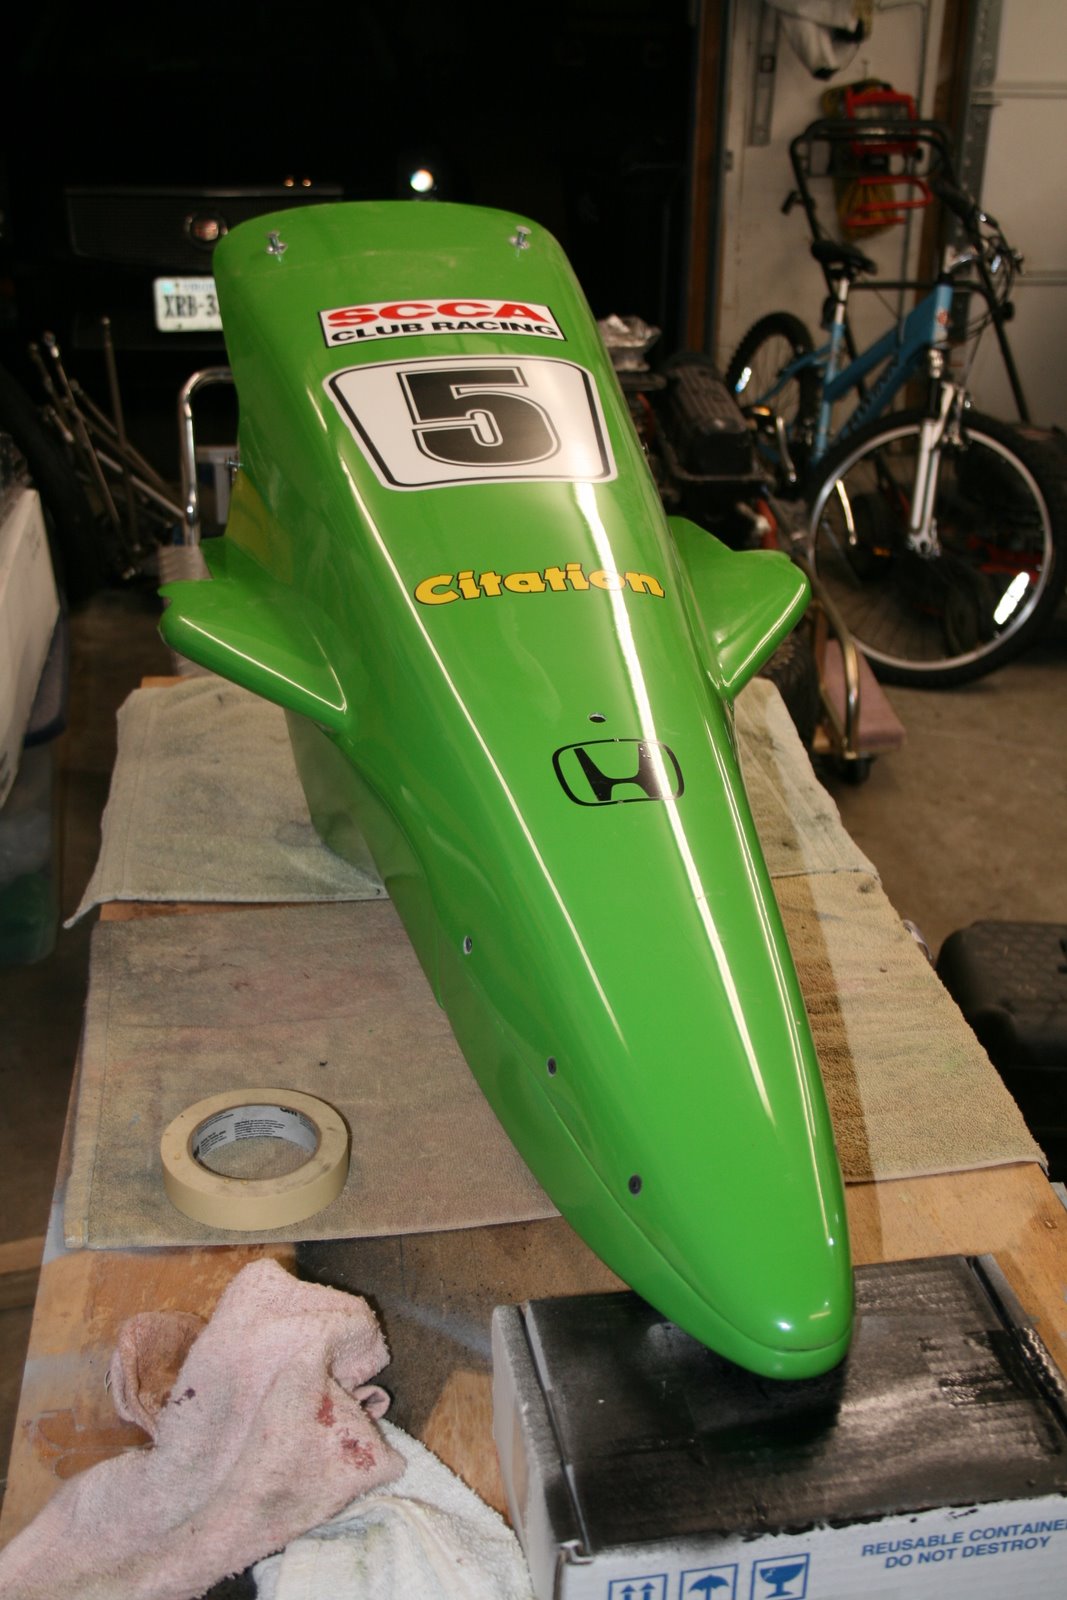
Hopefully it is actually as Aero as it looks. Seems like it is going 140 right here on the work table :)
Wednesday, February 16, 2011
Airbox Concepts

With most of the car off at Eric's shop for fabrication things were getting pretty dull here at the Maisey garage.
So last night I stole some of my daughter's poster board (sorry Sammy) and mocked up one concept of an airbox.
My original thought was to keep the water surge tank in it's FC location (right behind the headrest). Talking to Eric this afternoon, we agreed on another location. So this piece turned out to be just an exercise.
Now that I know that I will have more room to work with, I will be making a larger box. The current plan is to incorporate a small scoop feeding through the side (between) the main roll hoops. Steve Oseth was kind enough to send me a bunch of pictures of his setup, and at this point I plan to make something similar to what he is running.
Once again this will be a lot easier to visualize once I have the car back in the shop.
Sean
Fuel Cell Complete (finally!)

So tonight I pulled the fuel pump/regulator assembly out of the cell and installed the new regulator.
Now for the drum roll...

I hooked the wiring back up and ran the pump. And, Viola - 56psi!
Another mystery solved and another milestone reached. The fuel cell assembly is now complete and working properly.
Many thanks to Tom and Julian at HPD. One less thing to worry about. (and that is a very good feeling).
Sean
Engine Cover Prep.

1) The FC engine had the carberator on the left side of the engine. To accomodate this, the engine cover has a relatively big (draggy) blister on the side and a flat flange on top for the FC scoop to attach. Neither of these is needed or desired for the new engine setup. So modificattion nuber one is 'shaving' off this blister and getting rid of the flat flange area.
2) The Honda Fit engine is a little taller than the FC engine in the middle, so I will need to make the engine cover higher to make room for the intake plenum and air filter areas.

It does not have the blistered area like my body work does.
It also does have the higher middle section that fares in the back of the main roll hoops and should make (I hope) enough room to clear the Honda intake.

So I decided that maybe a better approach was to take the best of both covers and combine them.
My initial thought was to cast a mold of the desired areas (marked by the masking tape above)...
While that idea worked out OK, I was too impatient to wait until I could borrow some mold release compound from my dad's shop. I waxed the area and coated it with non-stick oven spray...

And I got a fairly useful mold out of the process. It will definely be good enough to modify the green FC cover if I decide to go that route...
BUT, the red paint stuck to the mold in most places (should have waited and gotten the release agent from dad...
So I may end up going with plan "B" and just cut out the sections I want to use and bond them to the original engine cover. I will see what looks like the better approach once the car is back in the shop...
Fabrication nears completion!


With the new upper engine mount tied into the frame, the HPD stressed pan and these engine cradles in place the car should be very sturdy and stiff.

With a little luck I will be retrieving the car over the weekend. While Eric's considerable fabrication and engineering skills have given me a big leg up, there is still a daunting amount of work to do before the VIR debut....
But I am really looking forward to digging back in to the project over the coming weeks.
Sean
Thursday, February 10, 2011
More Fabrication Progress


Additional exhaust view

Subscribe to:
Posts (Atom)